Microphones
Microphones in Live Event Production

The Microphone is an integral part of live sound production. Those of us who have been exposed to Top of the Pops at an early age will know that every singer uses a microphone. The camera never focuses on the console, the amp rack, the monitors or the speaker system. We have had more than one caller ask about hiring or buying a microphone when what they actually wanted was a complete PA system.
What it is
Technically, a microphone is a device that converts variations in sound (either airborne sound or sound from a resonating body, such as the front of an acoustic guitar) into variations in voltage. Although most people would recognise the shape of a Shure SM58, microphones also come in other shapes and sizes (lapel mics, headphone mics, boundary mics, and contact mics are all commonplace).
What it does
Microphones are used to convert sound into an electrical form so that it can be amplified, processed, and mixed with other sounds before it is converted back into sound by loudspeakers.
How it works
In common use, there are three basic ways in which microphones convert sound into electricity:
- By using changes in sound pressure to move a coil in a magnetic field. This is how dynamic microphones (the most common form of vocal microphone) work: variations in air pressure cause a diaphragm to move. The diaphragm is attached to a coil, which either surrounds or is surrounded by a magnet. Movement of the coil within the magnet's field creates a very small potential difference (voltage) between the two ends of the coil. Ribbon microphones work in the same way, except that a thin conductive ribbon acts as both diaphragm and coil (movement of the ribbon within a magnetic field creates a small potential difference across the ribbon).
- By using changes in sound pressure to influence the reactance of a capacitor in an electrical circuit. This is how condenser microphones work: variations in air pressure cause a diaphragm to move. The diaphragm forms one plate of a capacitor. The distance between the plates of the capacitor (and hence its reactance) is altered by movement in the diaphragm. If DC voltage is applied to the circuit, the voltage across the capacitor varies as the sound pressure varies. Some budget condenser microphones (known as electret microphones) have one plate of the capacitor permanently charged.
- By using changes in sound pressure to distort (bend) a piezoelectric element. This is how most contact microphones work: the piezoelectric element produces a small voltage when distorted, and this varies as the sound pressure varies. While these are commonly known as transducers, all microphones are in fact transducers: a transducer is something that converts one form of energy (in this case sound) into another (in this case electrical energy).
How do you use it?
If all else fails, read the manual! There are also useful notes on most manufacturers' websites (see e.g. Shure's Basics PDF Guides).
Almost without exception, microphones should be connected directly to a mixer's microphone (XLR) inputs - usually via the stage box and multicore - using balanced XLR(F) to XLR(M) cable. If you are using a condenser microphone you will also need to switch on phantom power (either on that microphone's channel, or globally).
Generally, you point the business end at the thing you want to amplify, and get it as close to the thing you want to amplify as practically possible. This will improve separation: the mic will pick up more of the thing it is pointing at and less of everything else. It will also allow more gain before feedback occurs. However, some instruments (e.g. pianos, acoustic guitars) create sound over quite a large area, and moving the mic closer will inevitably focus more on one element of its sound than on another. Also, most directional microphones exhibit the Proximity Effect, which means that lower frequencies will increase in level as the microphone gets closer to the sound source. Achieving a sound that is relatively natural may therefore mean moving the mic further away, compromising separation and available gain. Adding another mic may help, but this will itself reduce separation and available gain, and may also have unwanted side effects (primarily comb-filtering, if the microphones are relatively close together). Generally it is best to use one microphone or pickup - and only one microphone or pickup - for each sound source. The main exceptions are:
Grand Piano
It is usual to use two microphones for a grand piano, with one covering the lower and the other covering the higher keys.
Accordion
It is common to use two microphones for an accordion, one for the left-hand and another for the right-hand keys.
Snare Drum
It is quite common - although not to the extent that it is usual - to use a second mic for the underside of a snare drum. This should be in opposite polarity to the top mic.
It is also fairly common practice to use more than one microphone with any instrument (e.g. marimba) that generates sound over an area that is too large to cover with a single mic.
Many large-diaphragm condenser-microphones look almost (if not completely) symmetrical, so it may not be immediately obvious which the business end is. For these it is good practice to label the live side, so that anyone unfamiliar with that make and model (or anyone in a hurry in poor light) can easily point the right side at the sound source.
Inbuilt pickups on acoustic instruments (such as under-saddle pickups on acoustic guitars, or bridge pickups on fiddles) often have limited high-frequency output, and it is sometimes desirable to use a mic as well as the inbuilt pickup. Condensers are the rule-of-thumb for high-frequency detail on acoustic instruments. However, it is still generally preferable to use one method (pickup OR mic), not both. Good-quality pickups - see below - are advisable for live applications.
When using microphones close together (e.g. with a group of backing singers), follow the three-to-one rule: have each microphone at least three times as far from its neighbour as it is from the sound source (voice or instrument). This allows a margin of about 10dB between neighbouring sound sources: enough to minimise the effects of comb-filtering and afford a usable degree of separation.
If you can't get the sound you want, it is worth trying different microphones and microphone positions before reaching for the EQ (see below for more information on microphone types).
Do you need one?
Simply, yes. Unless it generates sound electronically or has an inbuilt pickup, for every instrument or voice you want to make louder, you need a microphone. If there are four singers and two guitarists that need to be louder, you probably need a microphone for each of them. ‘Probably’ means you could in some circumstances get away with having two singers sharing one microphone, but ideally you would still use one microphone for each. The trombone might be loud enough on its own, but you would still need a microphone for it if:
- you needed the sound to get to a wider area than the instrument covered on its own;
- you were recording the show.
What sort do you need?
For general guidelines on the type of microphone suitable for any particular instrument, most manufacturers provide useful information (e.g. the Product Advisor on the AKG homepage, or Shure's Buyer's Guide). For other general information, read on.
For acoustic instruments with low acoustic output (quieter instruments, e.g. acoustic guitar), a contact microphone (a.k.a. transducer or ‘bug’) is often useful. Because the mic is in contact with the instrument, the instrument's own sound will be very much more prominent than surrounding sounds (even very loud ones, like drums & electric guitars). This helps to increase separation and reduce feedback. However, contact microphones often sound less natural than other types of microphone, and may need additional processing - e.g. dedicated preamplifiers or parametric equalisers - to compensate for this.
For everything else, unless it generates an electric signal already (in which case, see DI boxes), a dynamic or condenser microphone is the thing. Ribbon microphones are seldom appropriate for live use (see below).
The main practical differences between dynamic and condenser microphones are:
- Power supply. Condenser microphones (including electrets) always require a DC voltage in order to work. Usually this comes in the form of phantom power from the main desk. All our desks (and most modern desks) can supply phantom power, but some older desks and budget mixer-amplifiers do not include this facility. A few condenser microphones (e.g. the AKG C1000S) can use a battery instead.
- Frequency response. Because the physical mass of a coil is greater, dynamic microphones are generally less effective than condenser microphones at very high frequencies. Taking account of the limitations of other audio equipment, human hearing, and the actual frequency content of most instruments and voices, output above 16kHz is not generally important, so this difference is less crucial than it might first appear. Even so, condenser microphones often sound crisper and more transparent than dynamic microphones. Conversely, dynamic microphones can sound ‘warmer’ than condensers.
- Sensitivity. Again, this is partly related to the physical mass of the diaphragm. Condenser microphones are usually more sensitive than dynamics, which makes them more suitable for quieter sound sources. However, all condensers (including electrets) include a preamplifier, and this may distort where very high sound pressure levels are involved (e.g. with drums). Many condensers therefore incorporate a gain reduction switch, which reduces the signal before it arrives at the microphone's preamplifier. This allows them to be used with very loud sound sources, as well as quieter ones.
- Robustness. It has been claimed that a Shure SM58 (the dynamic mic everyone has heard of) will survive a 6' drop onto concrete. While we wouldn't advise you to try it, the chances are you would only dent the basket if you did. Condenser mics are more fragile.
- The effect of condensation. Dynamic microphones will let you breathe water vapour into them all night without apparent damage (we disinfect our baskets and pop filters routinely, in case you wondered). Condensers sometimes object to large amounts of moisture. Given Time and an Encouraging Climate (an airing cupboard is fairly good) a condenser will dry out and return to normal, but this is not much use if the lead singer has started to sound Strange without medication and there are four more numbers in the set.
For these reasons, dynamics are generally favoured for:
- Vocals;
- Instruments that don't need much very high-frequency response(e.g. electric guitar amps, drums);
- Instruments that have a high acoustic output - so sensitivity isn't an issue - (e.g. electric guitar amps, drums, brass);
- Situations where the mic could be dropped or otherwise damaged (e.g. hand-held vocals, Fierce drummers).
Condensers, on the other hand, are good for:
- Quieter instruments (e.g. acoustic guitars, harpsichords);
- Instruments needing more high-frequency detail (e.g. acoustic guitars, harpsichords, fiddles, flutes, cymbals).
Microphones also vary in their directional pattern.
Ribbon microphones always have a figure-of-eight pattern: they are equally sensitive to sounds arriving from directly in front of or directly behind the diaphragm, and completely insensitive to sounds arriving from the sides. Because they are also easily damaged, they are not generally appropriate for live use, and are seldom seen on live stages.
A dynamic or condenser microphone generally has one of three patterns (although some condensers - e.g. the AKG C414 - have switches that enable more than one pattern, and some of these also have a figure-of-eight option):
Omnidirectional
The microphone is equally sensitive to sound from any direction.
Cardioid
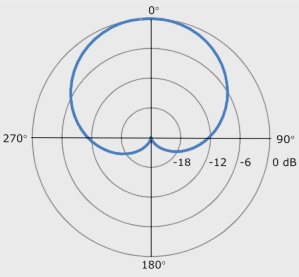 Cardioid Response Plot
The microphone is more sensitive to sound arriving from in front of the diaphragm, less sensitive to sound arriving from the sides, and not at all sensitive to sound arriving from behind it.
Hypercardioid
Like cardioid, but with an even narrower pattern. Hypercardioid mics also have a small region of increased sensitivity directly behind the diaphragm. They offer the optimum gain before feedback. Supercardioid mics lie somewhere between cardioid and hypercardioid, having a similar pattern to hypercardioid, but with a slightly wider pattern and lower rear sensitivity.
The most common form in live use is the cardioid pattern, although hypercardioid mics are also common. Omnidirectional mics are less often seen. Hypercardioid mics have the best feedback rejection.
Omnidirectional microphones are also known as pressure microphones: the rear of the capsule is enclosed, so the microphone responds directly to changes in pressure at the front of the diaphragm, irrespective of direction.
Directional microphones are also known as pressure gradient (or simply gradient) or velocity microphones: there are vents in the rear of the capsule, so the microphone responds to the difference (i.e. the gradient) in pressure between the front and back of the diaphragm. This is affected by the angle between the microphone and the sound source, and by the source frequency (there is usually some cancellation of lower frequencies unless the microphone is very close to the sound source). This has two consequences:
- Cardioid mics are usually more sensitive to low frequencies when used closer to the sound source (this is known as the Proximity Effect);
- Covering the vents reduces or cancels the microphone's directional properties.
For these reasons, omnidirectional mics are sometimes favoured for close-up use on loud sound sources (there is no increase in bass response) and CUPPING A CARDIOID MICROPHONE BASKET IN YOUR HANDS CAUSES FEEDBACK.
Most microphones designed specifically for vocals are cardioid or hypercardioid, and have a tailored frequency response (with a ‘presence peak’ somewhere in the 4-8kHz range, and reduced bass sensitivity to counter the proximity effect).
Radio Microphones
Radio Microphones are simply microphones that use radio waves instead of wire to transmit a signal to the desk. They have a transmitter (either built-in or plugged into the microphone's XLR socket), and a receiver (to convert the radio wave back into a normal signal that the mixer can use). They come in pretty much all the shapes and sizes available in standard microphones, but the most common are:
Hand-held
Like an ordinary hand-held microphone, but allowing greater freedom of movement;
Headset
Mounted on a headset, often used in dance routines;
Lapel
Clip-on microphones, often used for interview and broadcast applications. These are also known as Lavaliere microphones, although the term more properly refers to microphones that are hung on a neck cord (a less common type, with similar applications).
Transmitter/receiver combinations can also be used with other signal-generating equipment (electric guitars often use wireless systems).
Radio microphones and other transmitter/receiver combinations also involve a choice between:
UHF
Ultra High Frequency. These are generally more expensive, but usually have more possible transmission bands, a greater usable range, and are less prone to interference and dropout than VHF models.
VHF
Very High Frequency. These are cheaper to manufacture than UHF (typically retailing for about half the price). In many situations they work well enough, however.
2.4 GHz
Data Frequency. These use frequencies from 2,400 to 2,483.5 MHz (the same frequency range as bluetooth and wi-fi devices). Their effective transmission range is shorter than UHF or VHF models, and because they share a frequency range with commonplace public devices they are more likely to experience interference. Most have sophisticated inbuilt software to sniff out interference-free frequencies, so a single unit will generally be relatively easy to use, but multiple units may be more problematic. On the plus side, they are generally cheaper than comparable UHF units, transmitted audio quality is high, and their frequency-range is legal worldwide.
Diversity
Diversity systems have more than one receiver channel, and will automatically use the strongest signal available. This makes them much less prone to transmission problems (most notably dropout) in situations where the microphone is moved about, which is generally the reason you want a radio mic in the first place.
All radio microphones use a form of noise reduction known as a compander (compressor/expander). This is similar to Dolby noise reduction systems used in tape recording, and is used because the dynamic range of the radio signal is less than the dynamic range of the microphone. Ordinarily the effect of this will be inaudible, although high gain/sensitivity settings will increase compression, and may make the microphone more prone to feedback (see Sensitivity, below).
Controls that come with a radio mic & receiver may include:
Frequency
Many systems allow variation of the radio frequency. The transmitter frequency needs to be the same as the receiver frequency, so if you change the frequency on the microphone, you need to change the receiver frequency to match it. However, see the information on licensing, below.
Sensitivity
Some transmitters have a sensitivity control (the equivalent of a gain control). Use the lowest setting that gives you an adequate signal. Increasing the sensitivity of the microphone may cause compander effects to become more noticeable, as well as increasing the risk of feedback. There may also be a sensitivity control on the receiver, and some systems allow control of transmitter settings from the receiver menu.
Output Level
The receiver may well have a level control (‘Output’, or ‘AF Level’) which sets the level at the receiver output. Set this so that the level at the mixer input is within the usable range of the channel gain control.
Squelch
This is the equivalent of a noise gate acting on the radio signal, and mutes the receiver when there is no signal present. Setting the squelch threshold too high can cause signal dropout. With the transmitter switched off and the squelch control at its minimum setting, gradually increase the squelch setting until the hiss is silenced. Then switch the transmitter on and check that the signal is OK. It is better to have no squelch than no signal.
Radio microphones can be only used without a licence on licence-exempt channels. These are in the VHF frequency range from 173.8 to 175 MHz, and in the UHF range ("channel 70") from 863 to 865 MHz. Radio microphones generally have a bandwidth of 200 kHZ and should not overlap frequencies outside the licensed bands, which restricts the usable UHF range to 863.100 at the lower end, and 864.900 at the upper end. Some separation between individual microphone channels is also required to reduce the risk of interference, and in practice this means only four1 radio microphones can be used simultaneously on licence-free channels (although this can be extended if VHF and UHF systems are used at the same time).
A UK-wide shared licence (currently £85.00 for one year) to operate on a further 14 UHF (or 15 VHF) frequencies can currently be obtained through Ofcom. However, all 14 frequencies cannot be used simultaneously without interference: the practical reliable limit is around 8 frequencies. Most manufacturers include guide notes and optimum frequency presets for simultaneous multiple-frequency use, and this will give a clearer indication of what you can expect from specific systems.
Access to historic UHF shared licence frequencies (channel 69, from 854 to 862 MHz) ceased from 1 January 2013. The new shared licence range (channel 38, from 606 to 614 MHz) is now available. Most radio systems designed for use on channel 69 cannot operate (and cannot be modified to operate) on channel 38, so you need to take this into account if you are considering the purchase of a second-hand radio system.
Many radio microphones can be programmed to operate on unlicensed as well as licensed channels, so it is important to check that any radio microphone you intend to use - whether you own it or hire it - will be operating on exempt or pre-paid licensed channels. Equipment can be confiscated and you can be fined or imprisoned for unlicensed use.
- Note that this includes all radio equipment: a radio in-ear monitor system uses at least one of the available channels.